Inspecting outbound HTTPS traffic on Junos 15.1X49-D80.4 or higher.
The SRX has had application security functionality for many years now. This works great for http traffic, but less so for encrypted traffic. For this reason, the high-end SRX has acted as an SSL proxy for quite some time. This feature now is available in the 300 series, 1500 and vSRX, with Junos 15.1X49-D80.4. So, let’s look at how this works and how to configure it.
Man in the middle.
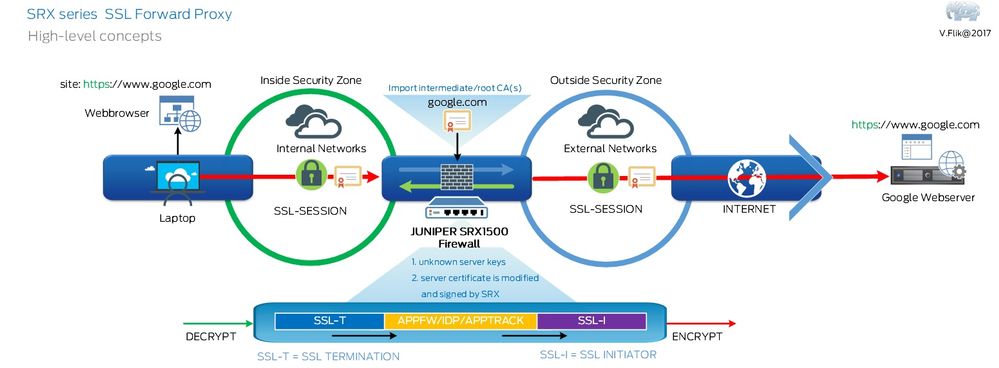
Https relies on certificates for authenticating and encrypting the connection. The server buys a certificate from a Certificate Authority the client trusts. The client trusts this CA because a root- and intermediate certificate are imported into the browser or other application using HTTPS. This way the client also trusts the server because of the chain of trust.
Now we want to break the encrypted communication on the SRX because we want to inspect this traffic. So, we need to:
- Make sure we present a certificate to the client it trusts.
- Make sure we trust the certificate issued by the same’s ca’s we trust on the client.
Valentijn once again created a nice drawing to clarify things:

Now that we know what to do, let’s look at how to do it:
Trusting a list of ca’s in the SRX.
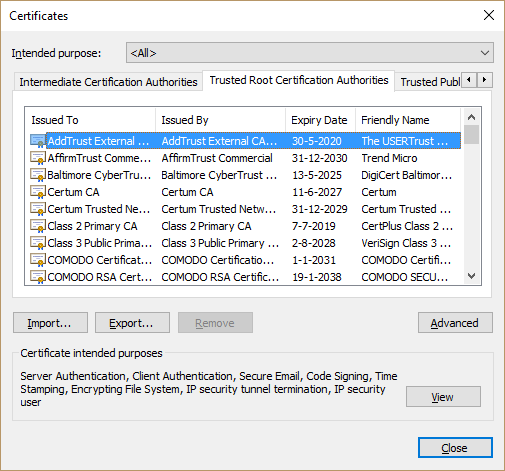
To give you an idea of what a list of trusted ca’s should look like, try to locate it in your browser. As an example here’s a part of the list in Internet Explorer:

To get to this screen go to settings internet option-> content -> certificates -> Trusted Root Certification Authorities
To get a list similar to this one into your SRX you issue the following command in operational mode:
root@leen-1500> request security pki ca-certificate ca-profile-group load ca-group-name ca-default filename default
Making the client trust the SRX
It would make sense in a production environment to create a certificate on a CA running on a domain controller and use this one the SRX and other place you need it. Then you add the root ca certificate to the browsers you need them in with domain policies and you’re done.
For testing purposes we will create a certificate on the SRX and export a CA cert to import it on the browsers we need it in:
Step 1) create a public private key pair
request security pki generate-key-pair certificate-id root size 2048 type rsa
Maybe it’s good idea to use a different name than we did (root) and a better key size!
Step 2) Using the key-pair we just generated we create a self-signed certificated:
root@leen-1500> request security pki local-certificate generate-self-signed certificate-id root domain-name leen-1500.wsa.local email "user@domain.com" add-ca-constraint subject DC=wsa,DC=local,CN=leen-1500 '
Note: the FQDN of this srx is leen-1500.wsa.local
Step 3) Instruct the SRX to trusted the root-ca’s and use the certificate just created. We move to configuration mode now:
user@host# set services ssl proxy profile trusted-ca-group-profile trusted-ca
user@host# set services ssl proxy profile trusted-ca-group-profile root-ca root
The configuration should show this now:
root@leen-1500> show configuration services ssl proxy
profile trusted-ca-group-profile {
trusted-ca all;
root-ca root;
}
At this point the configuration of the SRX is almost done. We just need to tell security policies to use the ssl proxy server. This is done by an application service called ssl-proxy:
set security policies from-zone trust to-zone untrust policy allow-https match source-address any
set security policies from-zone trust to-zone untrust policy allow-https match destination-address any
set security policies from-zone trust to-zone untrust policy allow-https match application junos-https
set security policies from-zone trust to-zone untrust policy allow-https then permit application-services ssl-proxy profile-name trusted-ca-group-profile
resulting in:
policy allow-https {
match {
source-address any;
destination-address any;
application junos-https;
}
then {
permit {
application-services {
ssl-proxy {
profile-name trusted-ca-group-profile;
}
}
}
}
}
As a final step we need the client (browser) to use. In the example config this is done like this:
root@leen-1500> show security pki local-certificate certificate-id root
Certificate identifier: root
Issued to: leen-1500, Issued by: DC = wsa, DC = local, CN = leen-1500
Validity:
Not before: 04-12-2017 12:24 UTC
Not after: 04-11-2022 12:24 UTC
Public key algorithm: rsaEncryption(2048 bits)
root@leen> request security pki local-certificate export root root-ca type pem filename /var/tmp/root.pem
The file /var/tmp/root.pem now holds a cert you can FTP or SCP to your computer to import it as a trusted ca in your browser.
By now you see that you recognize far more applications in apptrack. You can block in greater detail in application firewall rules, etc.
Have fun. I did!