Overview
NETCONF through a firewall, Part 1.
Junos OS NETCONF and SSH Tunneling (Part 1)
Let's say you have a network of devices that are behind a firewall and you can only access them through a jump-host. This means you need to first log in to the jump-host, and from there you can access the devices.
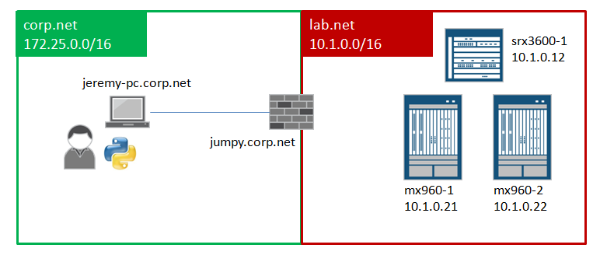
Take for example the following setup: I have a laptop called jeremy-pc.corp.net and a jump-host called jumpy.corp.net. Behind "jumpy" I've got a few hundred EX Series switches, a few SRX firewalls, and a few MX Series routers: All of the network devices are in the private 10.1.0.0/16 network. A simplified view:

In order for my Python programs to connect from jeremy-pc to the SRX and MX Series, I need to go through jumpy, I cannot ssh directly to them (which means I cannot open a NETCONF session directly either).
In order to make all this work, I need to do the following:
- Create an ssh-key.
- Install the public ssh-key on the Junos OS devices, srx3600-1, mx960-1, and mx960-2.
- Set up my user account on jumpy.corp.net to allow SSH forwarding.
- Set up my user account on jeremy-pc.corp.net to ssh-port tunnel.
- Activate SSH tunnel and ssh-key from jeremy-pc.corp.net, then connect!
Let's go through each of these steps.
Create an ssh-key
If you are not familiar with the process of generating ssh-keys, it is fairly straightforward, provided you have the SSH utilities installed. Use the ssh-keygen command to create the public and private keys. Here I am creating a pair called "jeremykey" (private key) and "jeremykey.pub" (public key). You will be prompted to enter a passphrase, which I recommend you use.
1	[jeremy@jeremy-pc.corp.net] ssh-keygen -f jeremykey
2
3	Generating public/private rsa key pair.
4	Enter passphrase (empty for no passphrase):
5	Enter same passphrase again:
6	Your identification has been saved in jeremykey.
7	Your public key has been saved in jeremykey.pub.
Install the Public ssh-key onto Junos OS Devices
Now copy your public key file to each of the Junos OS devices. You will need to first copy them to your jump-host, and then from there scp them to each Junos OS device. Assuming that I've copied the file jeremykey.pub to each Junos OS device, I can install the key from the Junos OS CLI; for example, on the SRX3600-1 device:
1	jeremy@srx3600-1> configure
2	Entering configuration mode
3
4	[edit]
5	jeremy@srx3600-1# set system login user jeremy authentication load-key-file jeremykey.pub
6
7	[edit]
8	jeremy@srx1400-1# commit and-quit
Set Up "Jumpy" for SSH Agent Forwarding
I now need to set up my user account on jumpy.corp.net so that it will forward my SSH connections when I originate them from my laptop, jeremy-pc.corp.net. To do this, I need to edit the SSH config file in $HOME/.ssh/config so that it looks like this:
1	Host *
2	  ForwardX11Trusted yes
3	  ForwardAgent yes
4	  Protocol 2
For more details about the SSH config file, you can do a "man ssh_config". The above example is considered very open since it applies to all hosts. You can get very specific on configs, but for the sake of simplicity, we'll leave it like this.
Now on to the tricky part, setting up SSH port forwarding.
Set Up "Jeremy-PC" for SSH Port Forwarding
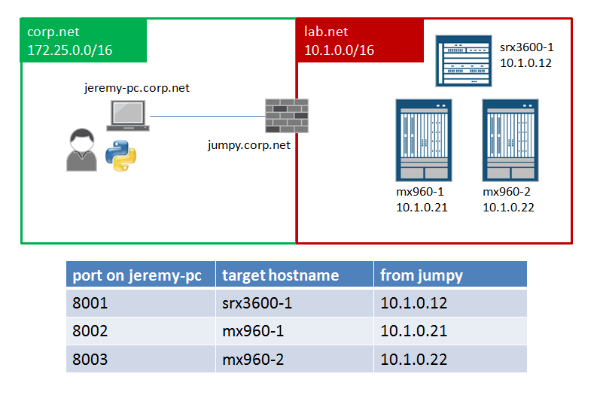
The technique for ssh-port forwarding is to designate ports on jeremy-pc.corp.net that get mapped to specific hosts reachable from jumpy.corp.net. I can pick any ports that I want, but generally in the range above the range 1024. I use ports >= 8000. The following illustrates the mapping I want to create:

On jeremy-pc.corp.net, I create an SSH config file in $HOME/.ssh/config that looks like the following.
01	Host jumpy-tunnel
02	   Hostname jumpy.corp.net
03	   ForwardX11Trusted yes
04	   LocalForward 8001 10.1.0.12:22
05	   LocalForward 8002 10.1.0.21:22
06	   LocalForward 8003 10.1.0.22:22
07	   ControlPath ~/.ssh/master-%l-%r@jumpy:%p
08	   ControlMaster auto
09
10	Host srx3600-1.jumpy
11	   User jeremy
12	   Hostname localhost
13	   Port 8001
14
15	Host mx960-1.jumpy
16	   User jeremy
17	   Hostname localhost
18	   Port 8002
19
20	Host mx960-2.jumpy
21	   User jeremy
22	   Hostname localhost
23	   Port 8003
24
25	Host *
26	   ForwardAgent yes
27	   Protocol 2
28	   StrictHostKeyChecking no
29	   UserKnownHostsFile=/dev/null
There is a lot to dissect in this config file, but the main technique here is that the hostjumpy-tunnel is what will be used to set up the port forwarding, then each unique host, e.g., srx3600-1.jumpy, is used to associate a name so we don't need to remember all the port mappings.
Activate ssh-key on "Jeremy-PC"
In order for ssh-keys to work, you need to have an "ssh-agent" running and then add your keys to the agent. Depending on your system, the ssh-agent might be running already. Here is the process to start up the ssh-agent manually and add your ssh-key:
1	[jeremy@jeremy-pc.corp.net] eval `ssh-agent`
2	[jeremy@jeremy-pc.corp.net] ssh-add jeremykey
The first command starts the ssh-agent process. The use of eval is needed to capture the ENVIRONMENT variables that are returned by ssh-agent. The second command loads the ssh-key. You will be prompted for the passphrase at this point (not shown).
The next step is to create the port mapping tunnel to jumpy. The following command opens an SSH tunnel and puts the process in the background. Note here that the SSH target is jumpy-tunnel, which was the host in the SSH config that defined all of the LocalForward definitions.
1 [jeremy@jeremy-pc.corp.net]$ ssh -f -N jumpy-tunnel
Now that the tunnel is active, and the ssh-key is active, you can directly SSH to the remote Junos OS device by referring to the hostname defined in the SSH config file. For example, to SSH directly to the SRX3600-1 device, use the name srx3600-1.jumpy:
1	[jeremy@jeremy-pc.corp.net]$ ssh srx3600-1.jumpy
2	Warning: Permanently added '[localhost]:8001' (RSA) to the list of known hosts.
3	--- JUNOS 12.1X44-D20.3 built 2013-07-19 04:28:29 UTC
4	jeremy@SRX3600-1>
In Part 2 of this blog, I will illustrate a Python script that makes a NETCONF connection and performs a basic "hello, world" with the remote device.
Continue reading Part 2 ...
Source
Network Automatic Blog - Jeremy Schulman - Nov. 1, 2013.
Reposted with permission to TechWiki.